Two Circular Needle Cast On for Two at one time Socks, Gloves, Mittens and Muffatees
You will need two 24 -32″ circular needles of the same needle size, your yarn will need to be divided into two separate balls, one for each sock.
Step 1: With needle #1 cast on all of the stitches for sock #1 as listed in your pattern (Red yarn in photos).
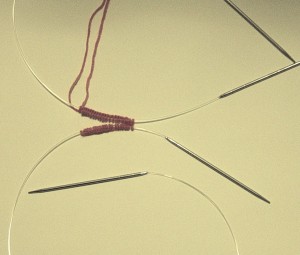
Step 2: Slide the stitches to the opposite end of the needle, and transfer 1/2 of the stitches to needle #2, starting with the 1st cast on stitch (the end without the yarn tails). Slide the stitches onto the cables as shown in fig. 1.
(helpful hint – you are temporarily finished with needle #1, the needle with the yarn tails (in top of photo), so stick both needle tips into your yarn ball for sock #1. This will help to keep the unused needle out of your way when casting on sock number 2.)
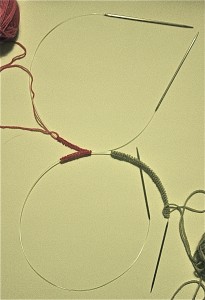
Step 3: Using the second ball of yarn for sock number 2, pick up the #2 needle tip closest to the folded end of sock #1’s cast on stitches (in fig.1 the fold is shown to the right of the cast on stitches you will cast onto the tip shown on the right of the bottom needle in the photo), begin casting on all of the stitches for sock #2 (Fig. 2, green yarn in photos).
Hint: needle #2 is the needle without the yarn tails, not stuck in the ball of yarn.
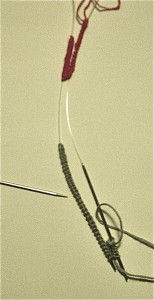
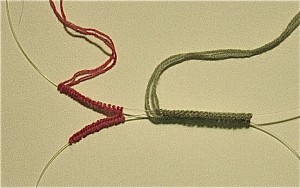
Step 4: Starting with the last cast on stitch of sock #2 (the end with the yarn tails), transfer 1/2 of the stitches onto needle #1 (Fig. 3). Slide stitches onto the cable (Fig. 4). Hint: the yarn tails for both socks should be on needle #1.
Begin Knitting your socks:
Making sure your stitches are not twisted, join in the round by knitting the stitches on needle #2 for sock #1, then
drop the yarn, pick up yarn for 2nd sock and knit the stitches for sock #2. Slide the stitches to other end of needle #2. Turn work, push needle #1 back into the stitches, bringing the stitches into working position on the tip of needle #1, pick up the other end of needle #1 (it should be the longer needle on the left side) and begin knitting the stitches on needle #1. You have just completed one round for both socks.
Continue to knit the socks as per your pattern.
Helpful Hint: place a removable pin marker at the beginning of sock #1. This will help you to know when you have completed a full round for both socks.


Wow that was odd. I just wrote an really long comment but after I clicked submit my comment didn’t appear.
Grrrr… well I’m not writing all that over again. Regardless, just wanted
to say excellent blog!
Hi! I could have sworn I’ve been to this blog before but after browsing through some of the post I realized it’s new to me.
Anyhow, I’m definitely happy I found it and I’ll be bookmarking and checking back often!